If you’ve ever experienced stiffness in your hips or lower back after sitting for extended periods, you’re definitely not alone. In our modern lifestyle, where we often find ourselves working at a desk, studying, or even scrolling through our phones, it’s common for our hips and lower back to become tight and weak.
The great news is that dedicating just a few minutes each day to stretching can help restore your mobility, alleviate pain, and boost your energy levels. In this blog, we’ll look at some simple yet effective stretches you can perform at home to enhance the mobility of your hips and lower back. You won’t need any equipment, just a comfortable space and a little bit of time.
Why Mobility Matters?
Our hips and lower back endure a significant amount of stress daily, and when they become stiff, it can result in pain, bad posture, and even injuries. This is why incorporating just a few minutes of stretching into your everyday routine can have a substantial impact. The great news? You don’t require any equipment, just a bit of floor space and a mat if you have one.
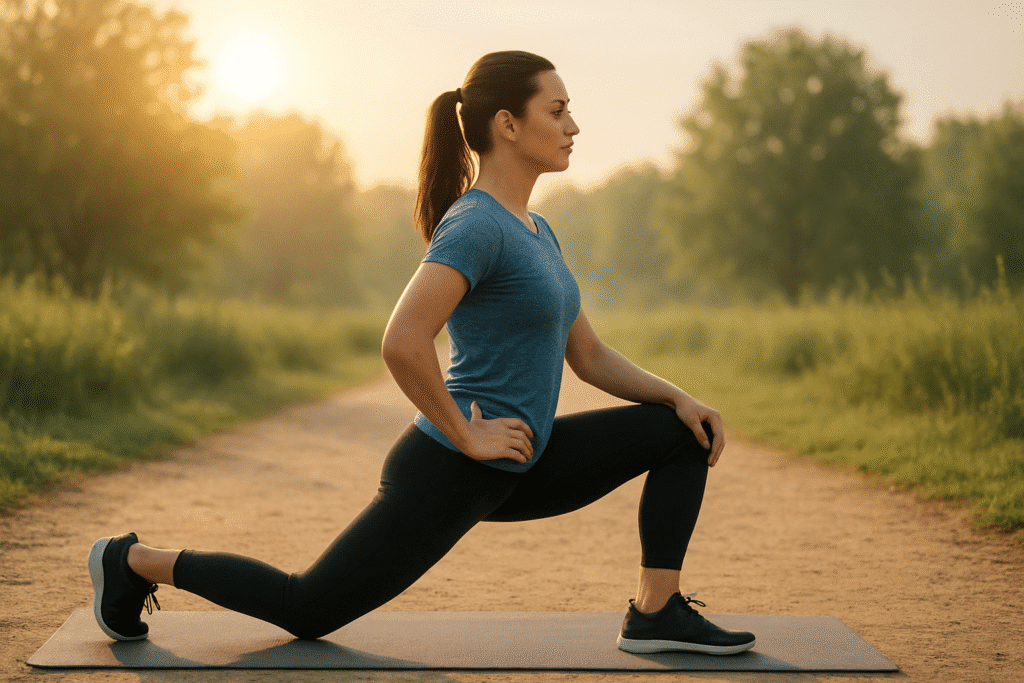
Stretch 1: Hip Flexor Stretch (Low Lunge)
The hip flexor stretch, commonly known as the low lunge, is an excellent exercise for releasing tension in the front of the hips. Tight hip flexors are a common issue, especially for people who sit for long hours at a desk, drive frequently, or engage in activities that keep the hips in a flexed position.

How to Perform the Hip Flexor Stretch?
- Begin in a kneeling position on the floor.
- Step your right foot forward so your knee is bent at a 90-degree angle and your left knee remains on the ground behind you.
- Keep your torso upright and your core engaged.
- Slowly shift your hips forward until you feel a gentle stretch in the front of your left hip and thigh.
- Hold the stretch for 20–30 seconds, breathing deeply and avoiding any bouncing movements.
- Repeat on the opposite side.
Benefits of the Hip Flexor Stretch
- Opens up tight hip flexors caused by prolonged sitting.
- Improves posture by counteracting forward pelvic tilt.
- Reduces lower back discomfort linked to hip tightness.
- Enhances mobility and flexibility in the hips, aiding overall movement.
Tips for Best Results
- Avoid overarching your lower back; focus on moving the hips forward, not leaning backward.
- Keep your front knee aligned directly above the ankle for stability.
- For a deeper stretch, you can raise your arms overhead or gently twist toward the front leg.
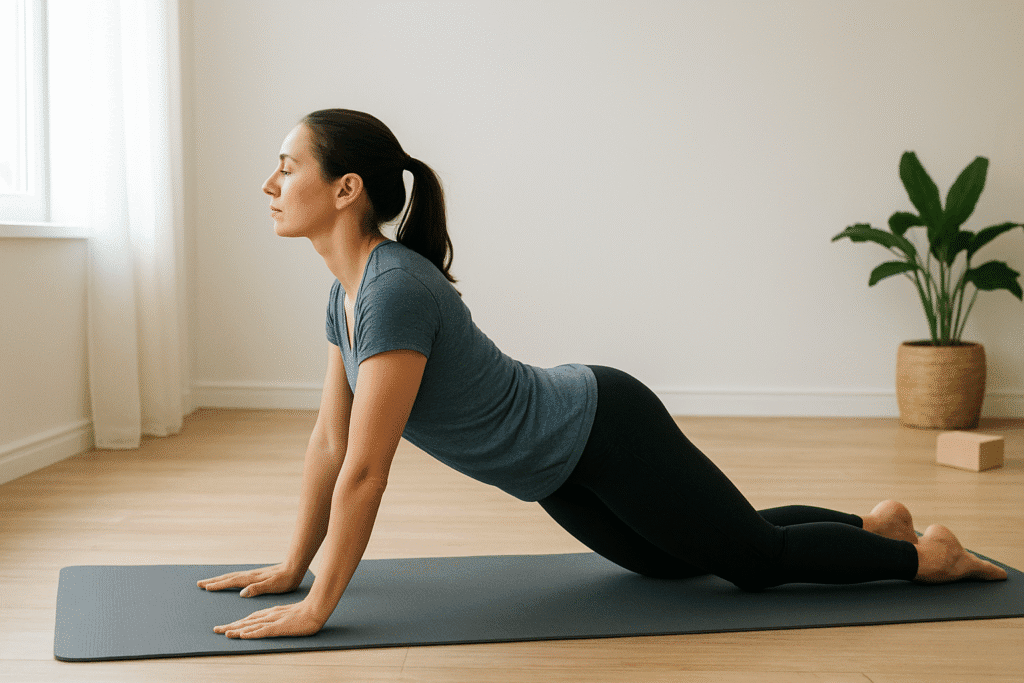
Stretch 2: Cat-Cow Stretch
The cat-cow stretch is a gentle, flowing movement that combines two yoga poses: Marjaryasana (cat) and Bitilasana (cow). While it’s commonly known for easing back tension, what makes this stretch unique is its ability to mobilize each segment of the spine individually. Instead of moving the back as one stiff unit, cat-cow encourages the vertebrae to glide over one another, promoting segmental spinal movement something that gets restricted with too much sitting or poor posture.

How to Perform the Cat-Cow Stretch?
- Start on all fours with your wrists under your shoulders and knees under your hips. Keep your spine neutral and your gaze toward the floor.
- Cat Pose (Marjaryasana): Exhale as you round your spine toward the ceiling, tucking your chin to your chest and drawing your belly button toward your spine.
- Cow Pose (Bitilasana): Inhale as you drop your belly toward the floor, lifting your chest and tailbone upward while keeping your shoulders away from your ears.
- Flow slowly between these two positions for 5–8 rounds, syncing each movement with your breath.
Unique Benefits of the Cat-Cow Stretch
- Segmental Spinal Mobility: Unlike static stretches, cat-cow mobilizes the spine vertebra by vertebra, preventing stiffness in individual spinal joints.
- Nervous System Reset: The rhythmic movement combined with breath activates the parasympathetic nervous system, helping to reduce stress and calm the mind.
- Cerebrospinal Fluid Circulation: The gentle pumping action enhances circulation of cerebrospinal fluid (CSF) around the brain and spinal cord, which supports spinal health and mental clarity.
- Core Engagement with Release: While cow pose encourages spinal extension, cat pose subtly engages the deep core muscles, making it both a stretch and a light strengthening exercise.
Tips for Best Results
- Move slowly and mindfully avoid rushing. The power of this stretch comes from the fluid, controlled transitions.
- Focus on initiating the movement from your pelvis, not just your shoulders or neck.
- Try closing your eyes and syncing your breath with the movement for a meditative effect.
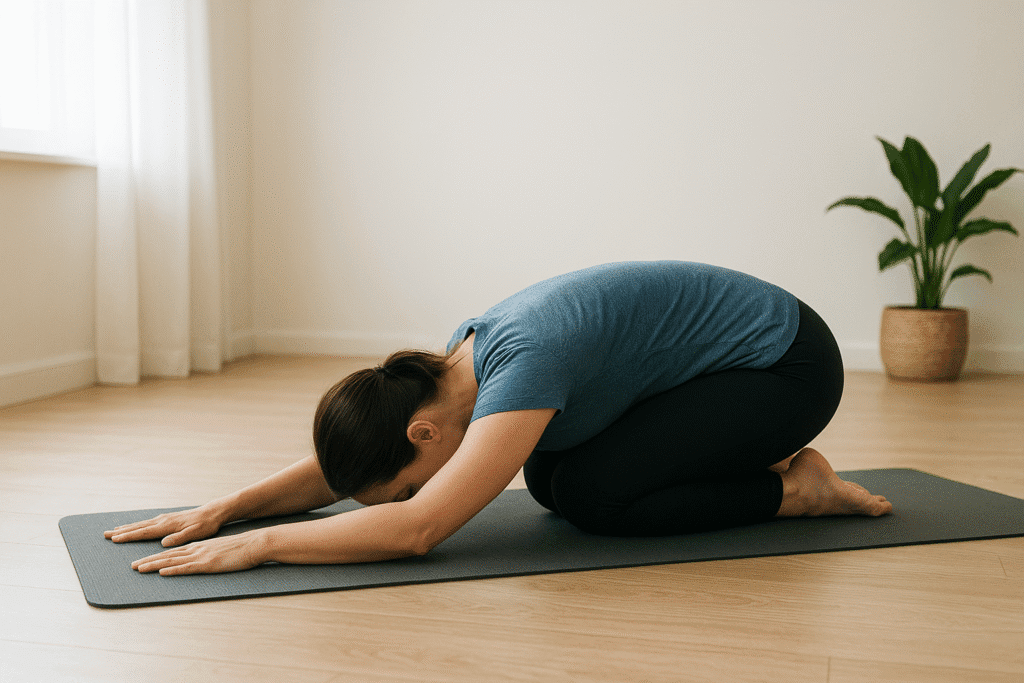
Stretch 3: Child’s Pose (Balasana)
The child’s pose, or Balasana, is often seen as a simple resting position, but what makes it uniquely powerful is how it encourages diaphragmatic breathing while lengthening the spine. Unlike many stretches that focus only on muscles, child’s pose gently compresses the abdomen against the thighs, which naturally guides your body into deep belly breathing. This not only calms the nervous system but also subtly massages the internal organs, aiding digestion and relaxation.

How to Perform Child’s Pose?
- Start on your hands and knees in a tabletop position.
- Bring your big toes together and gently lower your hips back toward your heels.
- Extend your arms forward with palms facing down, allowing your chest to melt toward the floor.
- Rest your forehead on the mat, keeping your neck long and relaxed.
- Hold for 30–60 seconds or longer, breathing deeply into your belly and lower back.
Unique Benefits of Child’s Pose
- Facilitates Deep Diaphragmatic Breathing: The slight abdominal compression makes your breath expand into the rib cage and back body, which improves lung capacity and relaxes the diaphragm.
- Spinal Decompression: Unlike passive lying-down stretches, child’s pose lengthens the spine with the help of gravity, relieving pressure between vertebrae.
- Parasympathetic Activation: The forward-folding, inward-facing posture signals the body to shift into “rest and digest” mode, reducing stress and anxiety.
- Gentle Organ Massage: As the belly presses against the thighs, it stimulates circulation in the digestive tract and kidneys, supporting internal function.
Tips for Best Results
- If your hips feel tight, place a cushion or folded blanket between your hips and heels for support.
- For shoulder relief, bring your arms back alongside your body with palms up instead of stretching them forward.
- Close your eyes and focus on your breath filling your back and side ribs for a deeper meditative effect.
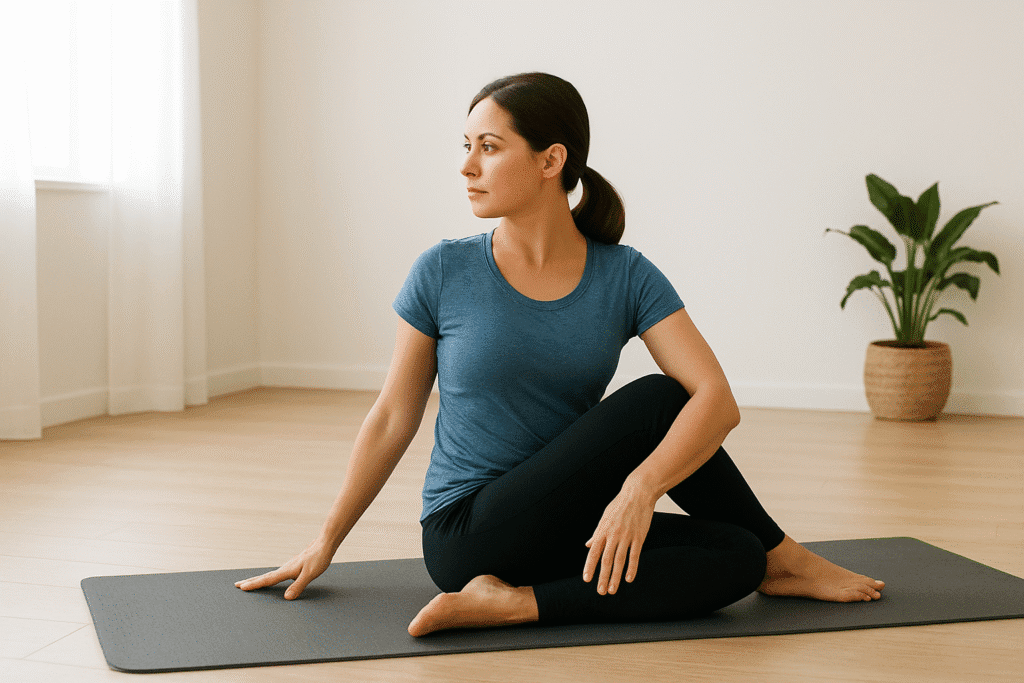
Stretch 4: Seated Spinal Twist
The seated spinal twist, often practiced as a variation of Ardha Matsyendrasana, is more than just a posture for flexibility it uniquely promotes axial rotation of the spine, which is rarely targeted in daily movement. Most people bend forward, backward, or sideways, but true rotational mobility is often neglected. This twist restores balance by engaging the deep spinal stabilizers and intervertebral muscles that keep the spine healthy and resilient.

How to Perform the Seated Spinal Twist?
- Sit on the floor with your legs extended.
- Bend your right knee and place your right foot on the outside of your left thigh.
- Keep your left leg straight, or for a deeper variation, bend it and tuck the foot beside your right hip.
- Place your right hand on the floor just behind your hip for support.
- Bring your left elbow to the outside of your right knee, using it as leverage.
- Inhale to lengthen your spine, and exhale as you gently twist your torso to the right, keeping your shoulders relaxed.
- Hold for 20–40 seconds, breathing steadily, then repeat on the other side.
Benefits of the Seated Spinal Twist
- Targets Axial Rotation: Unlike forward folds or backbends, this stretch specifically works the rotational movement of the spine, keeping the smaller stabilizing muscles active.
- Improves Digestive Health: The twisting action creates a gentle “wringing out” effect that stimulates blood flow to abdominal organs and supports digestion.
- Balances Posture: It counteracts asymmetries caused by daily habits, like crossing one leg more often or leaning to one side when sitting.
- Neuromuscular Re-education: By pairing breath with spinal rotation, it retrains the nervous system to move through its full range safely and smoothly.
Tips for Best Results
- Always lengthen the spine upward before twisting; avoid collapsing forward.
- Keep the twist gentle think of “unwinding” the spine rather than forcing it.
- For added support, place a folded blanket under your hips if your lower back feels tight.
Conclusion
Hip and lower back mobility stretches are easy, efficient, and can be performed right in your living room. By incorporating these exercises into your daily routine, you’ll experience enhanced flexibility, decreased stiffness, and improved overall posture. Keep in mind, a bit of daily attention can significantly contribute to maintaining your body’s strength, flexibility, and comfort.

 Medically reviewed by